🧪Demo 的子部分
Game
Game 的子部分
LOL游戏助手
使用深度学习方法,帮你赢得游戏
State Machine Event Bus Python 3.6 TensorFlow2 Captain 信息New Awesome
应用截图
这款应用程序共有四项功能
监控识别LOL游戏应用程序,并判断当前游戏处在什么样的运行状态

第二个是推荐一些英雄来玩。根据你的敌方队伍已经禁用的英雄,这个工具会为你提供三个推荐选项来帮你提前针对你的敌人,获得先发优势。

第三个功能将扫描小地图,当有人向你走来时,会弹出一个通知窗口来提醒你。

最后一个功能将根据敌人的装备列表为您提供一些装备推荐。

应用架构

视频链接
在 Bilibili 上观看
在 Youtube 上观看
Repo
Roller Coin Assistant
Using deep learning techniques to help you to mining the cryptos, such as BTC, ETH and DOGE.
ScreenShots
There are two main funcs in this tool.
- Help you to crack the game, go Watch Video
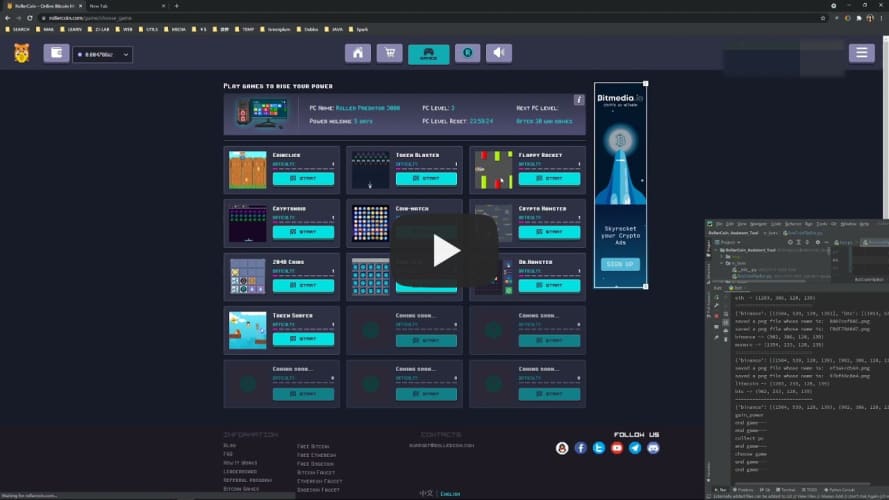
- only support ‘Coin-Flip’ Game for now. (I know, rollercoin.com has lower down the benefit from this game, thats why I make the repo public. update)
- Help you to pass the geetest.
- only support level 1 captcha test for now. there are three levels of geetest captcha test
How to use
- open a web browser.
- go to this link https://rollercoin.com, and create an account.(https://rollercoin.com)
- keep the lang equals to ‘English’ (you can click the bottom button to change it).
- click the ‘Game’ button.
- start the application, and enjoy it.
Tips
- only supprot 1920*1080, 2560*1440 and higher resolution screen.
- and if you use 1920*1080 screen, strongly recommend you to fullscreen you web browser.
Video Link
Checkout in Bilibili
Checkout in Youtube
HPC
Plugins
Plugins 的子部分
Flink S3 F3 Multiple
Normally, Flink only can access one S3 endpoint during the runtime. But we need to process some files from multiple minio simultaneously.
So I modified the original flink-s3-fs-hadoop and enable flink to do so.
StreamExecutionEnvironment env = StreamExecutionEnvironment.getExecutionEnvironment();
env.enableCheckpointing(5000L, CheckpointingMode.EXACTLY_ONCE);
env.setParallelism(1);
env.setStateBackend(new HashMapStateBackend());
env.getCheckpointConfig().setCheckpointStorage("file:///./checkpoints");

final FileSource<String> source =
    FileSource.forRecordStreamFormat(
            new TextLineInputFormat(),
            new Path(
                "s3u://admin:ZrwpsezF1Lt85dxl@10.11.33.132:9000/user-data/home/conti/2024-02-08--10"))
        .build();

final FileSource<String> source2 =
    FileSource.forRecordStreamFormat(
            new TextLineInputFormat(),
            new Path(
                "s3u://minioadmin:minioadmin@10.101.16.72:9000/user-data/home/conti"))
        .build();

env.fromSource(source, WatermarkStrategy.noWatermarks(), "file-source")
    .union(env.fromSource(source2, WatermarkStrategy.noWatermarks(), "file-source2"))
    .print("union-result");

env.execute();Usage
There
Install From
For now, you can directly download flink-s3-fs-hadoop-$VERSION.jar and load in your project.$VERSION is the flink version you are using.
implementation(files("flink-s3-fs-hadoop-$flinkVersion.jar")) <dependency>
<groupId>org.apache</groupId>
<artifactId>flink</artifactId>
<version>$flinkVersion</version>
<systemPath>${project.basedir}flink-s3-fs-hadoop-$flinkVersion.jar</systemPath>
</dependency>Or maybe you can wait from the PR, after I mereged into flink-master, you don't need to do anything, just update your flink version.
and directly use s3u://
Stream
Stream 的子部分
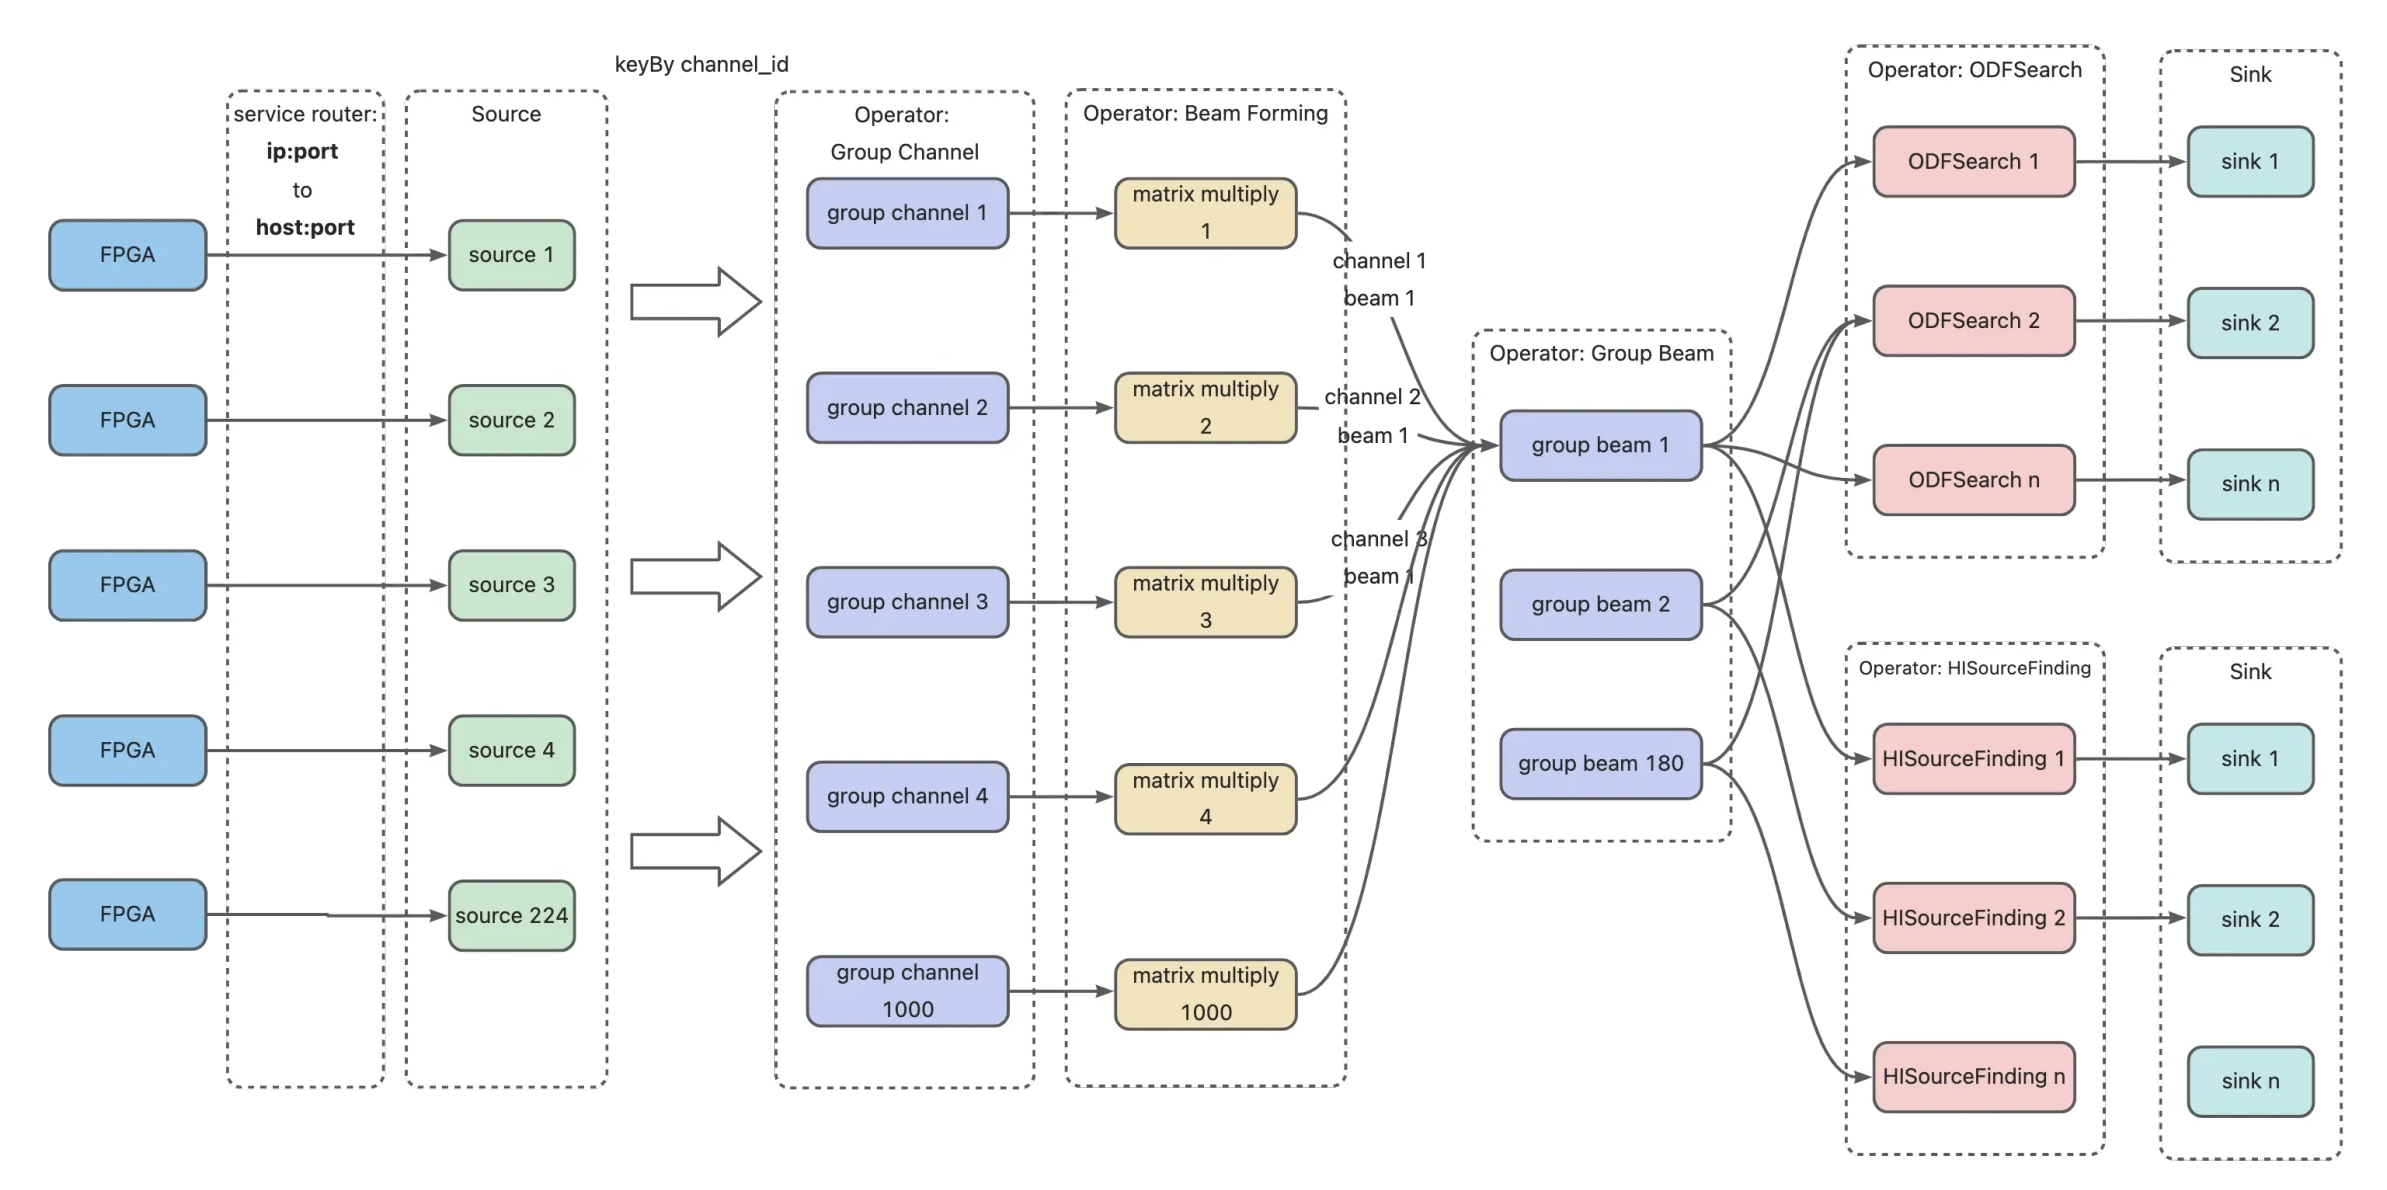
Cosmic Antenna
Design Architecture
objects
continuous processing antenna signal and sending 3 dimension data matrixes to different astronomical algorithm.

how data flows
Building From Zero
Following these steps, you may build comic-antenna from nothing.
1. install podman
you can check article Install Podman
2. install kind and kubectl
mkdir -p $HOME/bin \
&& export PATH="$HOME/bin:$PATH" \
&& curl -o kind -L https://resource-ops.lab.zjvis.net:32443/binary/kind/v0.20.0/kind-linux-amd64 \
&& chmod u+x kind && mv kind $HOME/bin \
&& curl -o kubectl -L https://resource-ops.lab.zjvis.net:32443/binary/kubectl/v1.21.2/bin/linux/amd64/kubectl \
&& chmod u+x kubectl && mv kubectl $HOME/bin
# create a cluster using podman
curl -o kind.cluster.yaml -L https://gitlab.com/-/snippets/3686427/raw/main/kind-cluster.yaml \
&& export KIND_EXPERIMENTAL_PROVIDER=podman \
&& kind create cluster --name cs-cluster --image m.daocloud.io/docker.io/kindest/node:v1.27.3 --config=./kind.cluster.yaml
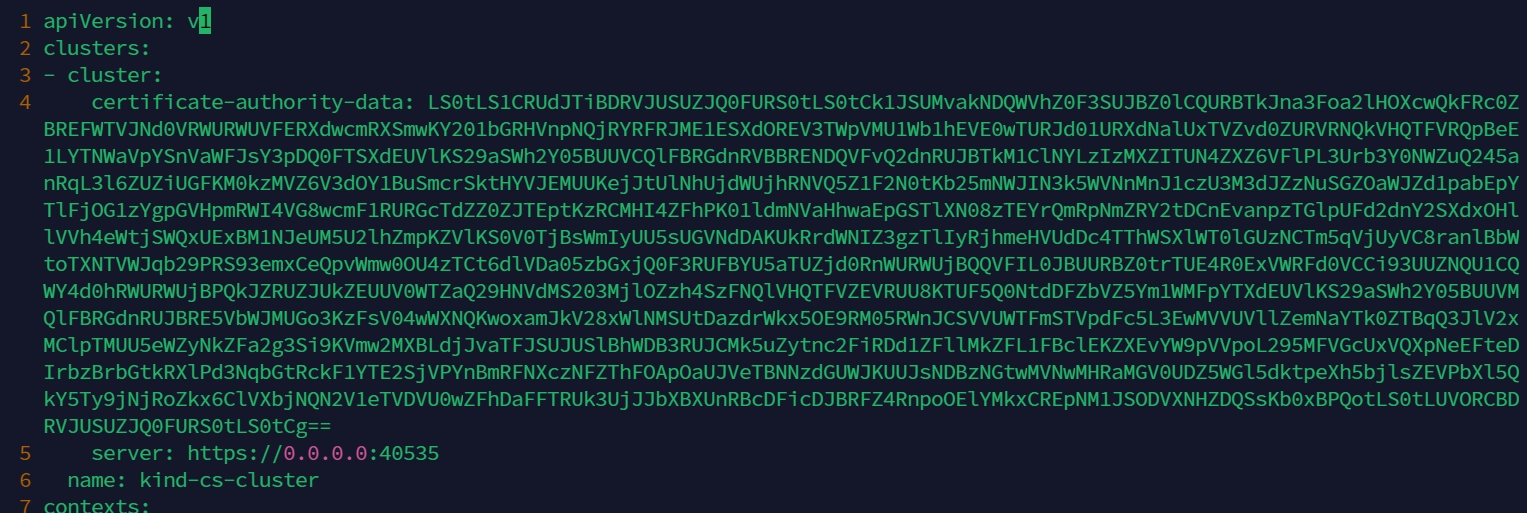
Modify ~/.kube/config
vim ~/.kube/config
in line 5, change server: http://::xxxx -> server: http://0.0.0.0:xxxxx
3. [Optional] pre-downloaded slow images
DOCKER_IMAGE_PATH=/root/docker-images && mkdir -p $DOCKER_IMAGE_PATH
BASE_URL="https://resource-ops-dev.lab.zjvis.net:32443/docker-images"
for IMAGE in "quay.io_argoproj_argocd_v2.9.3.dim" \
    "ghcr.io_dexidp_dex_v2.37.0.dim" \
    "docker.io_library_redis_7.0.11-alpine.dim" \
    "docker.io_library_flink_1.17.dim"
do
    IMAGE_FILE=$DOCKER_IMAGE_PATH/$IMAGE
    if [ ! -f $IMAGE_FILE ]; then
        TMP_FILE=$IMAGE_FILE.tmp \
        && curl -o "$TMP_FILE" -L "$BASE_URL/$IMAGE" \
        && mv $TMP_FILE $IMAGE_FILE
    fi
    kind -n cs-cluster load image-archive $IMAGE_FILE
done
4. install argocd
you can check article Install ArgoCD
5. install essential app on argocd
# install cert manger
curl -LO https://gitlab.com/-/snippets/3686424/raw/main/cert-manager.yaml \
&& kubectl -n argocd apply -f cert-manager.yaml \
&& argocd app sync argocd/cert-manager

# install ingress
curl -LO https://gitlab.com/-/snippets/3686426/raw/main/ingress-nginx.yaml \
&& kubectl -n argocd apply -f ingress-nginx.yaml \
&& argocd app sync argocd/ingress-nginx

# install flink-kubernetes-operator
curl -LO https://gitlab.com/-/snippets/3686429/raw/main/flink-operator.yaml \
&& kubectl -n argocd apply -f flink-operator.yaml \
&& argocd app sync argocd/flink-operator
6. install git
sudo dnf install -y git \
&& rm -rf $HOME/cosmic-antenna-demo \
&& mkdir $HOME/cosmic-antenna-demo \
&& git clone --branch pv_pvc_template https://github.com/AaronYang2333/cosmic-antenna-demo.git $HOME/cosmic-antenna-demo
7. prepare application image
# cd into  $HOME/cosmic-antenna-demo
sudo dnf install -y java-11-openjdk.x86_64 \
&& $HOME/cosmic-antenna-demo/gradlew :s3sync:buildImage \
&& $HOME/cosmic-antenna-demo/gradlew :fpga-mock:buildImage
# save and load into cluster
VERSION="1.0.3"
podman save --quiet -o $DOCKER_IMAGE_PATH/fpga-mock_$VERSION.dim localhost/fpga-mock:$VERSION \
&& kind -n cs-cluster load image-archive $DOCKER_IMAGE_PATH/fpga-mock_$VERSION.dim
podman save --quiet -o $DOCKER_IMAGE_PATH/s3sync_$VERSION.dim localhost/s3sync:$VERSION \
&& kind -n cs-cluster load image-archive $DOCKER_IMAGE_PATH/s3sync_$VERSION.dimkubectl -n flink edit role/flink -o yamlModify role config
kubectl -n flink edit role/flink -o yaml
add services and endpoints to the rules.resources
8. prepare k8s resources [pv, pvc, sts]
cp -rf $HOME/cosmic-antenna-demo/flink/*.yaml /tmp \
&& podman exec -d cs-cluster-control-plane mkdir -p /mnt/flink-job
# create persist volume
kubectl -n flink create -f /tmp/pv.template.yaml
# create pv claim
kubectl -n flink create -f /tmp/pvc.template.yaml
# start up flink application
kubectl -n flink create -f /tmp/job.template.yaml
# start up ingress
kubectl -n flink create -f /tmp/ingress.forward.yaml
# start up fpga UDP client, sending data
cp $HOME/cosmic-antenna-demo/fpga-mock/client.template.yaml /tmp \
&& kubectl -n flink create -f /tmp/client.template.yaml9. check dashboard in browser
Reference
Design
Design 的子部分
Yaml Crawler
Steps
- define which url you wanna crawl, lets say
https://www.xxx.com/aaa.apex - create a page pojo to describe what kind of web page you need to process
Then you can create a yaml file named root-pages.yaml and its content is
- '@class': "org.example.business.hs.code.MainPage"
url: "https://www.xxx.com/aaa.apex"- and then define a process flow yaml file, implying how to process web pages the crawler will meet.
processorChain:
  - '@class': "net.zjvis.lab.nebula.crawler.core.processor.decorator.ExceptionRecord"
    processor:
      '@class': "net.zjvis.lab.nebula.crawler.core.processor.decorator.RetryControl"
      processor:
        '@class': "net.zjvis.lab.nebula.crawler.core.processor.decorator.SpeedControl"
        processor:
          '@class': "org.example.business.hs.code.MainPageProcessor"
          application: "hs-code"
        time: 100
        unit: "MILLISECONDS"
      retryTimes: 1
  - '@class': "net.zjvis.lab.nebula.crawler.core.processor.decorator.ExceptionRecord"
    processor:
      '@class': "net.zjvis.lab.nebula.crawler.core.processor.decorator.RetryControl"
      processor:
        '@class': "net.zjvis.lab.nebula.crawler.core.processor.decorator.SpeedControl"
        processor:
          '@class': "net.zjvis.lab.nebula.crawler.core.processor.download.DownloadProcessor"
          pagePersist:
            '@class': "org.example.business.hs.code.persist.DownloadPageDatabasePersist"
            downloadPageRepositoryBeanName: "downloadPageRepository"
          downloadPageTransformer:
            '@class': "net.nebula.crawler.download.DefaultDownloadPageTransformer"
          skipExists:
            '@class': "net.nebula.crawler.download.SkipExistsById"
        time: 1
        unit: "SECONDS"
      retryTimes: 1
nThreads: 1
pollWaitingTime: 30
pollWaitingTimeUnit: "SECONDS"
waitFinishedTimeout: 180
waitFinishedTimeUnit: "SECONDS" ExceptionRecord, RetryControl, SpeedControl are provided by the yaml crawler itself, don’t worry.
you only need to extend how to process your page MainPage, for example, you defined a MainPageProcessor.
each processor will produce a set of other page or DownloadPage. DownloadPage like a ship containing
information you need, and this framework will help you process DownloadPage and download or persist.
- Vola, run your crawler then.
Utils
Porjects
Utils 的子部分
Cowsay
since the previous cowsay image was built ten years ago, and in newser k8s, you will meet an exception like
Failed to pull image “docker/whalesay:latest”: [DEPRECATION NOTICE] Docker Image Format v1 and Docker Image manifest version 2, schema 1 support is disabled by default and will be removed in an upcoming release. Suggest the author of docker.io/docker/whalesay:latest to upgrade the image to the OCI Format or Docker Image manifest v2, schema 2. More information at https://docs.docker.com/go/deprecated-image-specs/
So, I built a new one. please try docker.io/aaron666/cowsay:v2
Build
docker build -t whalesay:v2 .Usage
docker run -it localhost/whalesay:v2 whalesay  "hello world"

[root@ay-zj-ecs cowsay]# docker run -it localhost/whalesay:v2 whalesay  "hello world"
 _____________
< hello world >
 -------------
  \
   \
    \
                      ##        .
                ## ## ##       ==
             ## ## ## ##      ===
         /""""""""""""""""___/ ===
    ~~~ {~~ ~~~~ ~~~ ~~~~ ~~ ~ /  ===- ~~~
         \______ o          __/
          \    \        __/
            \____\______/
docker run -it localhost/whalesay:v2 cowsay "hello world"
[root@ay-zj-ecs cowsay]# docker run -it localhost/whalesay:v2 cowsay "hello world"
_____________
< hello world >
-------------
\ ^__^
\ (oo)\_______
(__)\ )\/\
||----w |
|| ||Upload
docker tag fc544e209b40 docker-registry.lab.zverse.space/ay-dev/whalesay:v2
docker push docker-registry.lab.zverse.space/ay-dev/whalesay:v2